Whether you are reading this and anticipate being in front of the camera or you’re a photographer trying to decide which lens to pack in your bag for your upcoming sessions this summer, I wanted to share what’s in my camera bag for your upcoming outdoor session. If you are a client, this is a great resource to be ensured that while I will be farther away than normal during our session, this will not affect the quality of work you will receive!
Before sharing my lens, let’s get technical!
From a technical standpoint, I choose my lens for my subject based on a vision I have for your photograph. Clients will notice that sometimes I keep the same lens on and sometimes I switch it up a few times. I think through the following two things:
1.) Do I want to use a PRIME lens or a ZOOM lens?
A prime lens is almost always my go-to. The images are noticeably sharper and you can capture beautiful bokeh (see below for what that is!). They are great for any light situation and there is very little image distortion. The lens is locked at a specific distance so it also means you’ll see your photographer move around more to get the shot they want. A zoom lens on the other hand has a wide range in distance that one can photograph from standing in one spot. A zoom lens is the most dynamic in terms of getting a variety of shots in a limited time.
2.) What do I want to focus on?
My other reason for changing out a lens is when I am switching gears for what my subject will be or story I will tell. Sometimes I want the whole image to be sharp–the people, the building– and may need a lens that will get everything in one frame. For individual portraits, close-ups, or where I want to draw your eye to a specific detail, I will put a lens on that can go to the lowest aperture possible. If you have the new iPhone, you’ll notice on portraiture mode, you can adjust the aperture so the background is blurry. This technique allows a low depth-of field and for portraiture, the look is pleasing to the eye. You’ll notice in the examples below that when I adjust my aperture to lower levels such as f/1.4 and f/2.8, you begin to notice an effect called bokeh. Bokeh is the out-of-focus quality behind your subject that distorts what would-be sharp images into blurry shapes.
{WHAT’S IN MY CAMERA BAG FOR MY SOCIALLY DISTANCED OUTDOOR SESSIONS}
24-70 MM LENS
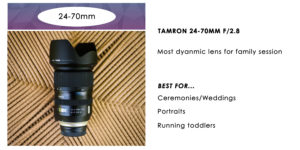
This is my newest ZOOM lens and I have only had it for about a year. I had debated needing this lens because I loved my prime lens so much but it has proven to be a game changer for chasing toddlers for photographs during family sessions and has a little big of a wide-angle look to make it interesting. For socially distanced session, I love this lens for the open shots (example: getting a photograph of front porch session with a lot more of your home showing) and I do not have to worry about moving as much without compromising a great image.
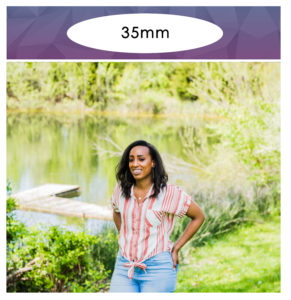
35MM LENS
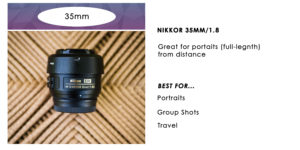
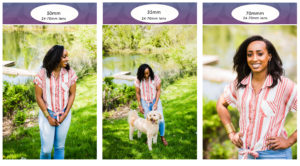
Up until I got my 85mm lens, the 35mm PRIME lens had been my *never take off my camera body* lens. This is actually my back-up 35mm as I had loved this lens so much I upgraded to a f/1.4. If you are a photographer or someone getting into photography reading this, the lens above was a great budget-friendly lens to start out with and I’d highly recommend starting with this as your first prime lens you try out. For socially distance photographs, I think the 35mm prime is perfect for full-length shots and group shots. For weddings, the 35mm is my main lens for formal family portraits and large wedding parties. Since this lens would require me to get closer to my subject for more detail shots, I’d probably stick to my 85mm or 70-200mm lens.
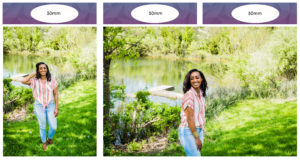
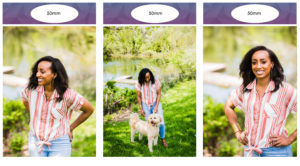
50MM NIKON LENS
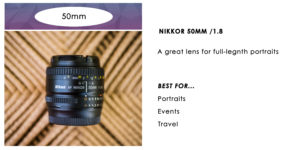
I’ll be honest, this isn’t my favorite lens. A lot of photographers swear by this PRIME lens as being their go-to. I admit it’s lightweight, versatile, and snaps high-quality images. This was my first prime lens I ever bought when I first started out. Over the years, I have added other prime lens to my bag and the 85mm is by far by lens I rarely take off. Nevertheless, this lens gets beautiful shots and for socially distanced sessions, it is a good lens for full-length images or group shots. I found myself moving around a lot more as you’ll notice in the examples.
85MM SIGMA LENS
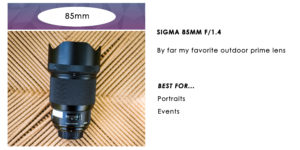
I am a loyalist and had always stuck with the name brand when it comes to my camera equipment. This 85mm lens is my most recent PRIME lens splurge (and my first non-Nikon lens). Since buying the 85mm two years ago, I barely take it off when photographing outdoor portrait sessions. I absolutely love how beautifully the images turn out and even though it is a longer distance prime and it forces me to move around a bit more, I can’t say enough about its high-quality performance.

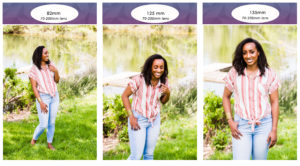
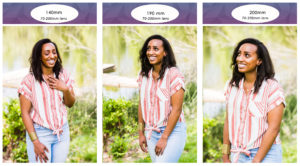
70-200MM NIKON LENS
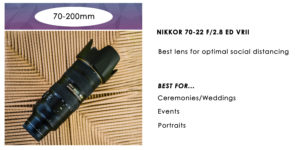
This is by far my favorite dynamic ZOOM lens to use for a wedding. I jokingly call this my paparazzi lens to because at corporate events and weddings, the 70-200mm lens allows you to be at a distance and get great natural candids of people without them feeling like you are invading their space. I love that not only can you be far away (which is great for weddings!), this lens also allows you to get sharp images in low-lighting without a flash so those dark sanctuaries are no longer *quite* as intimidating. Another great use for this lens is to get detail shots if you want to be further away; I typically use my macro lens but this is a great alternative. For the purpose of our topic of getting beautiful outdoor images at a distance, I LOVE this lens because if you notice in the examples below, the more I zoom my lens in, the sharper the subject and the more blurred the background (and you know I love that bokeh look!).
FINAL THOUGHTS
While this season of photographing your session outdoors may look a little different, the images delivered to you will continue to be top-quality and still range in a variety of shots. No, I may not be able to get close to fix your hair/shirt/pose and we will rely on each other for verbal cues to make little adjustments but what I can continue to guarantee is even from 6 feet+ away, your moments will be captured, your joy will be documented, and you will continue to have stunning images to hang on your wall.